homemade baby slings


Making your own slings gives you some great choices.  For example, fabric choices are endless!  Wether you need a sling for a formal affair, or just for day-to day use, you can pick the fabric design to match.  Fabrics themselves have different amounts of stretch,  support, and breathability, depending on your needs and tastes.  Want to stash stuff in your sling?  Just add a pocket!  (I like to have a pocket as my "purse", and one to carry a water bottle, toys, kleenex, etc)  Best of all, making your own slings can be cheap.  With some  inexpensive fabric, thread, and a sturdy set of rings, you can get into a sling for under $5!  At that price, you could have a sling for every day of the week, or every mood in the spectrum!

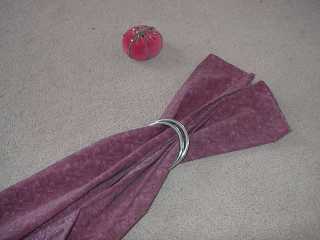
The slings that I make for myself have no padding around the edges.  Many sling manufactuers make slings with padding, with the rationale that it helps to contain the baby better.  I have found though, that I can very securely carry even a newborn in an unpadded sling.  My toddlers have also been comfortable and secure on my hip with this design, as well.  Some manufactuers even make unpadded slings.

If you wish to make a padded sling, please let me direct you to a company called Elizabeth Lee Designs.  They have a padded sling pattern in their catalog.  They also sell metal and nylon rings of various sizes and colors, too.

Homemade unpadded slings....

fabric
The average-sized adult needs about 2 yards of fabric, and about 1/4 yard extra if you want a pocket.  The tail of the sling will show the "wong" side of the fabric, so iif you would rather the tail match the rest of the sling, you could either pick a fabric where the "wrong" and "right" sides look simular, or add another panel of fabric to the tail. (requiring about 1/2 yard more fabric)  If you add a fabric panel to the tail, you will need a larger diameter ring, so the tail will still slide easily through the rings.  The width of the fabric should be from 32 to 38 inches, based on thickness of fabric, and preference.  (wider fabrics provide greater coverage over the bends of Baby's knees , and coverage of the back/ shoulders in the hip carry).  Thicker fabrics work better if the width is on the narrower side, so there is less fabric to possibly bind up in the rings.

Different fabrics behave differently under load of a baby, and their characteristics affect how easily the tail slides through the rings, and also how comfortable (stretchy or supportive) the sling is to the baby wearer and wear-ee.  Each sling has it's own personality!  In general, I prefer a little stretch to the fabric, as it comfortably stretches over the skin at the legs of Little One while in the hip carry position.   I find that fabrics that are very stretchy  cause some muscle strain in my upper back, as the baby seems to bounce up and down with every step I take. (My daughter actually loves this...and  bounces herself!  Aye, Aye, Aye!)  Simple 100% cotton weave works well...it hardly stretches at all, so it is very supportive to the upper back, but it may bind at Little One's legs in the hip carry.  This can be accomodated by making the sling a little wider so the fabric can be pulled beyond the bends of Baby's knees.

rings
I use metal rings from the hardware store, feed store, or rancher's supply.  (I probably would use nylon too, if I had an easy supply.)  I have heard that sailing shops carry the nylon rings, so that might be easier for you if you live near the water.  Anyway, I use two sizes of metal rings, based on how thick the fabric is:

smaller ring: 3 inch outer diatemer, 1/4 inch thick
larger ring: 3 1/2 inch outer diameter, 1/4 inch thick
both come in gold or silver tone
 Do not use those skinny little rings you can get say, from Wal-Mart's craft section!  They were designed to hold plants in a pot hanger, not a baby or toddler in a sling!  They will surely beeak!  Slimmer rings also have a harder time keeping the fabric smoothly running through them as you adjust the size.

One more tip...I usually air dry my slings that have  metal rings.  When you feel the weight of them in your hand, you understand why.  I envision my dryer having dimples and dents from the rings smashing into the sides.  I just take the tail out of the rings and drape the sling over something to dry.  I have dried nylon-ringed slings in the dryer without problems.
 

thread
plain old 50/50 poly/cotton works fine for me.

sewing needles
I use heavier duty ball point needles, since there are some stitches that go through six layers of fabric.  I actually broke a needle once...a startling and potentially ouchy thing to happen.  I'll mention it at the particular step in the process to give you a heads-up.

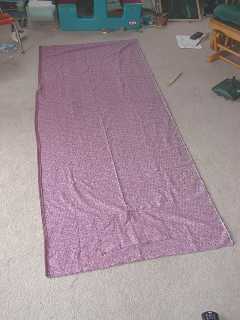
Here we go...

Wash and dry your fabric first!  Then it won't shrink to a too-small size with subsequent washings.  Determine how much fabric you will need.  If you are average build, about two yards is enough.  If you are making a pocket by folding the end of the tail 
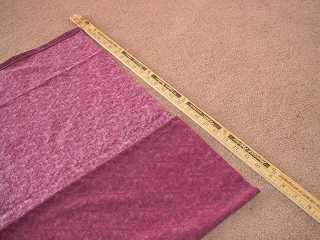
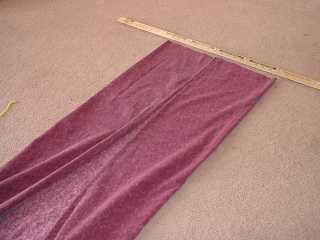
back on itself and stitching, add another 1/4 yard.  Choose a width between 32 and 38 inches and cut this width  along the entire two or so yards.  You should have a long rectangle.

Hem two of the long sides and one of the short sides.  The remaining unhemmed short side is where the rings will eventually go.  The short hemmed side is the end of the sling tail.  (notice the pocket is positioned at the end of the tail)  I make my hems by folding to the "wrong" side of the fabric about 1/4 inch and pinning, and then folding it over and once again and and stitching in place.  This gives the edges a folded hem that won't fray over time or by washing.


After the hemming is completed, lay out the fabric once again "wrong" side up.  Find the midpoint of length of the unhemmed short side.  Fold each side of the sling into this midpoint.


Here are the two sides of the sling folded to the midpoint.


Now, fold each folded edge into the midpoint again, so each side is now folded into fourths.  Pin these layers down, and carry to your sewing machine.  Stitch across the folded fabric about an inch or two inward from the raw edge to hold all of the folds in place.


Put the rings through the twice-folded end of the sling.


spread apart the folded edges of the sling, and prepare to fold the loose top edge of fabric over the rings and attach to the "wrong" side of the fabric.


After folding down the loose edge, turn the loose edge under about 2 inches, and pin into place.  Take it to your sewing macnine, and stitch the folded edge to the sling.  Be very careful here!  Take your time, let your machine handle this thickly-layered fabric nice and easy.  This is where I once broke my needle.


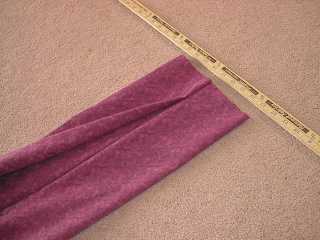
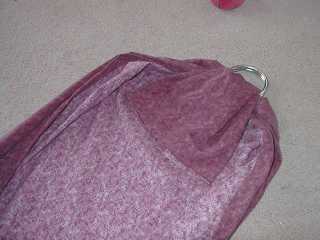
To make the fabric about rings more secure, stitch from the folded over (and now stitched) edge towards the rings about two or three inches in several places


If you are making a pocket by putting a pre-cut piece onto the sling, hem the edges of the pocket piece, and then stitch it to the end of the tail.  If you make your pocket too high on the tail, the pocket will stop you from singging up the fabric where the pocket meets the rings.  note: This may keep you from tightening the sling as much as you need to keep your baby secure. 


Now pass the tail end through both sets of rings, then fold the tail over the second ring the tail passed through.  The pass the tail through the first ring a second time.  (only this time going in the opposite direction)  This is the identical process as putting on a belt with rings on the end.  (remember those rainbow belts back in the 70's and 80's?)  Take care to not twist the fabric as it passes through the rings.  The "wrong" side of the fabric is what you should see facing out on the tail when completed.

To try the sling on, decide first which shoulder you want it to rest on.  Then, grasp the rings with that hand, tail facing outward.  Duck your head and opposite arm through the sling, and rest your sling on your chosen shoulder.  Place the rings high up on that shoulder before placing Little One inside, so you have plenty of room to tighten the sling securely.  Make the sling pouch bigger so you can comfortably maneover Baby into it.  Make the the sling pouch bigger by grasping the rings and pulling on the pouch to make the tail travel through the rings, making the tail part shorter and the pouch part bigger.   When your baby is inside, pull on the tail to make the pouch part smaller, tightening the sling securely around your baby. 

carrying positions
You can carry your baby in various positions, including my three favorite:


cradle hold
newborn to about 1 year
great for nursing, napping

front hold
about three months and up
great upright position for wee ones
and napping of all ages

hip carry
about 6 months and up
great for walks, getting things done, etc.  My own even nap this way.

other positions
You can also carry wee ones upright, but facing away from the parent by folding her legs crosswise inside the sling.  Another position is piggyback-style with toddlers with the pouch securely holding Baby's bottom and wrapping under her thighs and across her shoulderblades.


If at first you don't suceed...
Try over and over!  Allow yourself a few weeks of daily babywearing to get the hang of it.  It can be difficult at first getting the sling on your body, getting it in the right place, enlarging the pouch, maneovering the baby in, getting the sides of the sling in place where you want them, etc.  I have heard so many mothers tell me that they couldn't get the hang of it and give up after a few tries.   It can be the easiest way to carry your little one with some practice.

Give your body a chance to get used to wearing your baby, especially if Baby is older when you begin.  Don't put baby in all day from the first day.  Condition your back and shoulders by easing into it.  There is nothing like trying to care for you child(ren) and everything else while miserably stiff and in pain.


Hope this page was informative and inspiring in offering an alternative choice in babywearing. If you do decide to make a sling, I wish you the satisfaction of creating something unique for yourself that is so good for you and your baby.  Enjoy!

return to the main sling page

back to babies, breasts, and bottoms
[home]    [the mainstream mold]    [homeschooling]   [pregnancy/birthing]
Every Day Is Sacred   [crunchy links]  [what's new?]   [sign guestbook]   [view guestbook]