|
I started making my own prefold diapers when my original, purchased diapers showed heavy duty wear. (after about 2 1/2 years of use) The timing was good...as I was just learning to sew...and making a prefold diaper is an easy project to start with. There are advantages to making your own:
*you can customize diaper material, size and shape. Materials commonly used:
*terrycloth: is more absorbent than flannel, and is usually used as a bottom and/or middle layer. *thread: cotton, or cotton/poly Size
Shape
You can be creative with flannel
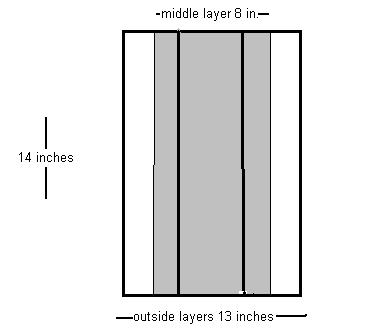
Prefold diaper diagram:
The gray area shown is an optional (but highly effective) middle layer, which provides more absorbency where the diaper gets wettest. The two outside layers are the same size. (shown here as 14in.x13 in.- about the same size as a standard prefold diaper) You can use any combination of fabric you like...either all flannel, or combo. of flannel and terry. As a baby nighttime diaper and regular use toddler diaper, I use terrycloth for the middle layer and one outside layer, and flannel for the other outside layer. (flannel next to baby's skin) Before beginning to cut out the diaper, wash and dry all fabrics first! Cotton will shrink the most during the first washing and drying. Before cutting the diaper, I measure the dimensions either on paper and pin to the fabric, or draw the dimensions directly onto the fabric with a fabric marker. To stitch the diaper together, I pin the layers, then use a fabric marker to make two lines dividing the diaper into thirds vertically. Then I stitch down each of the lines with a small, straight stitch on the sewing machine. These two stitched lines make the diaper easier to fold into thirds for use. Then I stitch around the edges of the diaper with wide but small zig zag stitches. If you can make rounded corners while you stitch, the diaper won't be firm and scratchy around the edges. I use a heavy duty ball point needle on my machine. If you are so inclined to make hourglass diapers or diaper covers, Elizabeth Lee Designs has a pattern for each on page 24 of their catalog.
[main diaper page] [the
ecological debate:cloth vs. disposable] [cloth
diapering products]
[an error occurred while processing this directive] |